|
The original brakes on 50s classic trucks leave a lot to be desired by today s standards. Their singlebore master cylinders leave you with no stopping power when a wheel cylinder fails. There is always the emergency brake, of course, but you will probably end Up doing a donut when your back wheels lock—assuming you can apply it in time Then there is the problem of brake fade At today s freeway speeds, and on long downhill runs, your old truck's original drum brakes can heat up, fade and fail.
Luckily, these problems are easily remedied by a little inexpensive updating that still leaves your classic close to original I'm talking about installing a power dual-bore master cylinder and venting your truck s brake drums. Together, these two tricks will make your truck stop like one equipped with front disc brakes, all for about a third the price and a tenth the hassle. And you won't be increasing your truck s unsprung weight either.
Unsprung weight includes all the components on your truck that are not supported by its springs, such as wheels and tires, axles and brake drums (or discs in the case of disc brakes). Why is unsprung weight undesirable? Because unsprung weight is what causes your truck to ride like, well… a truck. The more of it you have, the worse your truck will handle.
Brake drums weigh about a third of what rotors do, and brake cylinders weigh less than a quarter of what calipers do All told, we re talking about 50 or 60 unwanted pounds in the front with disc brake conversions, just where you really don't want added weight on a pickup Also, front disc conversions cost in the neighborhood of $1,200 to $1,500 and require a lot of fiddling, finding parts, and cobbling them together to make them work. So unless you just have to have front disc brakes to impress your friends, why go to the trouble?
I had my drums vented, picked up a dual-bore master cylinder with power booster, and got all the components I needed to do a complete brake job for under $600 from Vince Bunting at C H Topping in California Vince acquired the skills and techniques for venting drum brakes from the inventor of brake ventilation, a fellow named Mel Hamer. Hamer liked to run his hot rod at the dry lakes back in the fifties, but he didn't like the way the brakes faded when he tried to slow down after a flying mile run.
He reasoned that if he drilled a few holes in the drums, the heat would escape and the car would stop better. Hamer experimented and figured out a way to drill the holes so his drums would not be weakened or become unbalanced, then ventilated his car's drums. What he didn't realize at the time was just how well this would work for him.
After a couple of nuns and stops at the lakes, Hamer's friends were so impressed that they urged him to do their drums too. Soon Hamer was venting drums full time and couldn't keep up with demand. Later he started venting rotors too, when disc brakes came into fashion Before Mel Hamer died a few years ago, he passed his secrets on to Vince Bunting who was racing motorcycles at the time.
Venting actually does more for drum brakes than for discs. When drum brakes are vented, they stop without hesitation or fade, and they are less affected by water or dirt because the vent holes sweep contaminants away. The best part is that updating a high performance brake system with vented drums is quick and easy to do. The drums and master cylinder can be installed in an afternoon, and if you decide to do a complete brake job while you are at it, you might use up a whole day—if you're slow.
MOUNTING THE MASTER CYLINDER
C H Topping was able to supply a dual-bore master cylinder for my 58 Apache that was intended for a late model Ford van It came attached to a Ford dual-diaphragm power booster and was set up with a bracket to bolt right into my truck with the original pedal linkage All I had to do was remove the old master cylinder, disconnect the original brake pedal, and drill a couple of holes. The new mounting bracket uses the two original mounting holes for the old master cylinder as well, so l just loosely bolted the new cylinder in place, marked the positions for the new holes in the frame, then drilled them. The pedal linkage attaches the same way it did originally.
TUBE JOB
The next trick was to hook up the hydraulic tubing. Since I'm doing a total restoration, I decided to replace all of my truck's hydraulic lines and convert to DO I 5 silicone fluid, but you may not want to go that far. If not, you only need to pick up a couple of ready-made steel lines that are approximately the right length, and bend them to attach to the new dual-bore cylinder, eliminating the "T" that was used for the old single-bore cylinder.
The final thing you will need to do if you decide to add a power booster is hook up a source of vacuum. Most classic trucks have plugs in their intake manifolds that will make the job easy, but if yours doesn't, you will need to drill and tap a hole to accommodate the connecting hose that attaches to the power booster unit. Be sure to use vacuum hose, not ordinary fuel line, because a fuel line will collapse.
DRILLING THE DRUMS
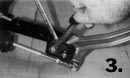
First, put your chassis on sturdy jack stands. Pop off the front wheel covers and the little dust caps over the axle nuts Pull out the cotter keys that secure the axle nuts and remove the nuts Now pull on the front wheels to remove the drums, bearings and all This method is the easiest way to remove front drums Unbolt the drums from the front wheels Remove the bearings and grease seals and clean out any grease.
Next, remove the back wheels Back brake drums usually need to be pulled off with a drum puller, although old Chevy drums will often come right off if you adjust the brake shoes loosely and then tug on the drums There are two types of drum pullers in common use The first, designed for most GM vehicles, grips the outside of the drum and pops it loose after a couple of sharp blows on the puller s center. The second type of puller is used for most old Ford and Mopar vehicles It pulls the drum off by its studs, and should never be struck in the center, because doing so could damage the differential.
You can check around for a local drum ventilating service, or ship yours off to C.H Topping where they will do a professional job. C H. Topping can also provide complete brake overhaul kits for your classic.
REINSTALLATION
The rear drums just slide back on, but don't forget to ad just your brakes if you loosened the shoes The front drums are attached to the hubs, and they and the wheel bearings and seals go on as a unit. Now is a good time to inspect, clean and pack your front wheel bearings. Look for instructions in upcoming issues on how to do this.
The only tricky part of dealing with my new master cylinder was filling it with fluid I used the new silicone type because it doesn't attract moisture or doesn't have to be changed. But because of the location of the new master cylinder—under the seat and floor of the cab—I had to use a ketchup squeeze bottle and a piece of plastic tubing to fill it up and top it off during ad justment.
Finally, all you need to do is take your hauler out for a test stop. A touch of the pedal will bring instant response, and down-hill runs will cause no sign of fading. But best of all, you know you will have a back-up hydraulic system if a wheel cylinder fails, so you don t have to worry about destroying some ill-tempered tort attorney's Mercedes while trying to stop.
|
|